Wednesday 31 October 2012

Happy Halloween 2012 Pumpkin Carving

Today we've carved our Pumpkins or 'Bump-kins' as my son calls them) made Skull cupcakes (update to follow) made Beef Stew and are now waiting for it to get dark so the kids can get dressed up and go trick or treating! Happy Halloween Everyone! And safe trick or treating. x


Tuesday 23 October 2012

Minnie Mouse Party

So sorry, this post appears to be 6 months late... As my son's birthday is fast approaching it occurred to me that on the bottom of the 'to be blogged' pile was my daughter's Minnie Mouse Party from back in June!
 
As it was the Jubilee we ended up having two parties in one weekend, and I have to admit that despite lots of early planning this one felt a little rushed, but it came together in the end and little lady had a great day. Click read more to see the full details...


Thursday 18 October 2012

Get well soon Laura: A Mojo Monday Card

A friend of mine had the misfortune of falling down the stairs yesterday - luckily nothing broken but tendon damage and crutches are definitely fun. So I decided to make her a 'Get well soon' card.
 
 
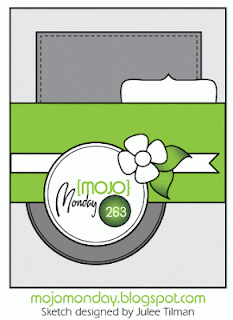
This had to be a quick card as I wanted to take it around today, so I used the Mojomonday sketch #263 from the Halloween card as my basis. The card was made using cardstock from K&Company's paper stack 'Poppy Seeds' and distress inks: Peacock Feathers Dusty Concord and Broken China. Dies are from Spellbinders and X-cut.


Wednesday 17 October 2012

Happy Halloween!!!

This is my first ever Halloween card, its not really a tradition to give them in the UK but then I managed to get my hands on the Fall set of Seasonal Distress Inks and was looking for an excuse to try them out.


I used this week's Mojo Monday sketch as a template, I tried to utilise my love of old book pages as much as possible so I could play around with some of the new inks (here I've used Distress Inks: Ripe Persimmon, Seedless Preserve, Black Soot and Antique Linen). I also tried out my new 'Sew-easy' kit on the edges - which wasn't as 'easy' as I'd hoped but I shall persevere, and if I ever get the hand of it I shall post a tutorial.


I decided to enter this card in the NMWC Halloween Creations Challenge and one of the requirements of the challenge was to use an image as the focal point, luckily I got the chance to borrow this amazing spider stamp from a friend. It's part of the 'Tim Holtz Stamp Halloween Blueprint Set'. I accented the 'spider' with Stickles in Black Diamond, and cut the stamp out using my circle punch, this is framed with a Spellbinders Picot Circles die-cut and handmade paper page rosette.

Saturday 13 October 2012

Etsy: Shop Launch!!!

Exciting news: The site's Etsy Shop is now officially open! I did a soft launch other day, just to test the format. The stock is mostly Christmas Tags at the moment but I'm hoping to add  Christmas Cards shortly and then a selection of personalised Birthday cards and Gift tags. So, please pop over and take a look!


Wednesday 10 October 2012

Burger Cupcakes [Suitable for Vegetarians]

I saw this concept on an old blog entry from Heather Taylor from "I do ... Inspiration" and fittingly I was Inspired. The photo that I had innocently found while researching superhero cupcakes on google images was that of Burger Shaped cupcakes! Some might say this idea is a bit kitch, naff or cheesy (burger pun) but I thought it was worth trying at least the once.
 
It's simply made by cutting a plain sponge cupcake in half across the horizontal, and then 'sandwiching' a disc of chocolate cake or brownie in between stuck together with Jam (for the tomato ketchup) and green buttercream (lettuce). I made my 'burgers' with some leftover chocolate cake but would have liked to have made the 'burger' with brownie for a difference in texture. If you have any, sesame seeds would also look the part (scattered over the top during baking).
 
I only made a small batch of these to try out the idea, my willing Guinea Pigs tomorrow are: Jac, Nicola and all the little ones :) Although I have to admit I've also made some traditional butterfly cakes and the kids decorated a few vanilla sponges cupcakes with pink buttercream - so something for every there hopefully.
 
 
*- please note the title of this blog  entry is meant in jest, obviously the suitability for vegetarians depends on the recipe used - but the vast majority of cake recipes will not involve the use of meat, although any recipe using eggs, milk or butter will not be suitable for vegans.

Tuesday 9 October 2012

Happy Birthday Dad!!!

Last year my Dad's Birthday card was a turning point for me, I deciding that I was never going to buy another card again, and have managed to make 95% of the cards I sent this year. My card making techniques and experience has come on leaps and bounds.
 
 
Last year's card (below) was inspired by Dad's boyhood hero "The Loan Ranger" and made using a sheet of My Mind's Eye (Lost and Found) "Boy Cowboy" 12x12 Paper and I hand cup the lettering from gold card. This year I couldn't help but continue the Cowboy  (above) - the letters were still hand cut, but from cork board. I die cut the tag from a sizzix combo set, and aged paper from Paper Cellar with Walnut stain and Black Soot, I also aged a Kraft 6x6 card blank. The Sherif badge is from a carboot sale and the horse shoe charm. The prima flower is from Dovecraft and the butter is a Marianne Creatable.


Handmade Card: Music, Twine and Time

My Step-Mum asked me to make a card for her Nephew as he was turning 30, my brief was simple: Something like my previous men's cards and he likes music. As I don't know Sam personally and can't ask if he minds having his baby photos blogged - I've done a bit of 'crime watch' style pixilation on the photo - Sorry if it spoils the effect somewhat, but I'd hate to offend someone by using their photo without permission.
This card was actually completed a while ago, but after it got lost in the post (1st class Royal Mail) and I thought it was a little cruel to do a 'and this is the card you could have had' post, lol. Luckily it turned up eventually (over a week later) so I finally think I can share it.


Monday 8 October 2012

New Distress Ink, My little ritual

Most people I know who collect craft supplies such as Distress Inks have their own little ritual for cataloguing and organising them. As I've purchased quite a few lately I've been thinking a lot about how I go through the same routine every time I get a new Ink - so much so that I've got it down to military precision (well, almost).

You may have already seen my colour chart that doubles as storage for my blending pads posts and it's really filling up now, so each new ink has to it's own place. I also have colour charts in both my A5 folder and pocket Filofax - not to mention the task of labelling of the ink pad itself.
 
 
Firstly, I open up all the new inks that need cataloguing (I usually buy 3 at a time on offer so it pays to be methodical) in this case I'm using the example of the 'Spring' limited edition seasonal inks. Each ink gets new blending foam pad from inkssentials at ranger. And I start by filling in the large colour chart. To limit the ink colour to the correct square I use post-its to mask all 4 edges. This is always my first proper taste of what the colour will actually look like so its quite exciting. Once dry I pop a square of sticky-backed Velcro in the centre (which will grip to the back of the foam pad once I've finished).
 
Next I take some scrap paper (here I used 3 unused pages from an old Filofax) and ink once in each colour. From this I cut 3 pieces: a 5cm by 1cm rectangle, a 1 inch butterfly punch, and a 1.5 cm bow punch.
 
The Butterfly fits perfectly in my resized A5 (sadly the seasonal inks have to go on the back for this sheet as I didn't originally allow for these). The bow fits into the boxes on my pocket filofax sheet (with extra boxes added here for the seasonal inks).
 
The 5cm by 1 cm strip goes on the side of each ink - this way I can see the colour easily when they are stacked, and quickly compare colours when using them together. I also take a silver pen from my papermania metallic bullet tip set and write the name on the side so they are easy to identify and there is no accidentally 'getting the wrong lid on the wrong ink' situation.

And that's my little ritual ... I feel much better for having shared, lol. This post also marks on official halt on Distress Ink purchasing still Christmas :( But apparently people need present ideas. That said when I started looking into Halloween cards and craft I have realised how I am seriously lacking I am in Oranges... [must controll buying impulses, must controll buying impulses]

Sunday 7 October 2012

Mojo Monday #261: Christmas

Here is my second card for the Mojo Monday competition this week. I went with a Christmas theme because it's getting to be that time of year AND it was a great excuse to break into my new Spellbinders Heirloom Ornaments (2010) set.


I also got to use my favourite Christmas sentiment stamp and (now, my reinker has arrived) I got to use lots of Brushed Corduroy and a bit of Aged Mahogany, and it wouldn't be a card from me at the moment without a page from an old book and a button (in this case a Marianne Creatables.
 
 
Here is the lovely sketch by Julee, why not head over to their site to check out all the amazing entries - some great inspiration there for all styles and techniques of cardmaking :)

Saturday 6 October 2012

Happy Birthday Emily! A Mojo Monday card.

It's my cousin's birthday today! Happy Birthday Emily! I decided to make her card but wasn't sure where I wanted to go with it until I realised it was Mojo Monday. I like this weeks sketch and have made two cards using it this week.


As Emily is a teen I put my trusty Brushed Corduroy down and steered myself towards the bright end of my Distress Inks range including my brand new Peacock Feathers (from the Spring limited editions), Milled Lavender, Dusty Concord and a little Broken China.


I also used a few distress techniques I've not tried before including scrunching up a plastic bag and flicking water. The scalloped edge on the circle is hand cut with Scallop Scissors from, the circle is from a 2inch X-cut punch and the tag is a die cut from a Sizzix scallop combo set. The dot paper (which continues on the inside) is from a paper stack from K&Company called Poppy Seeds.


I'm fairly happy with how the card turned out. I think the 'emily' letter could have been larger - I think I may need to invest in some larger font stamp sets, not to mention Birthday sentiments!